Grim Reaper Kitty: Free Halloween Crochet Pattern
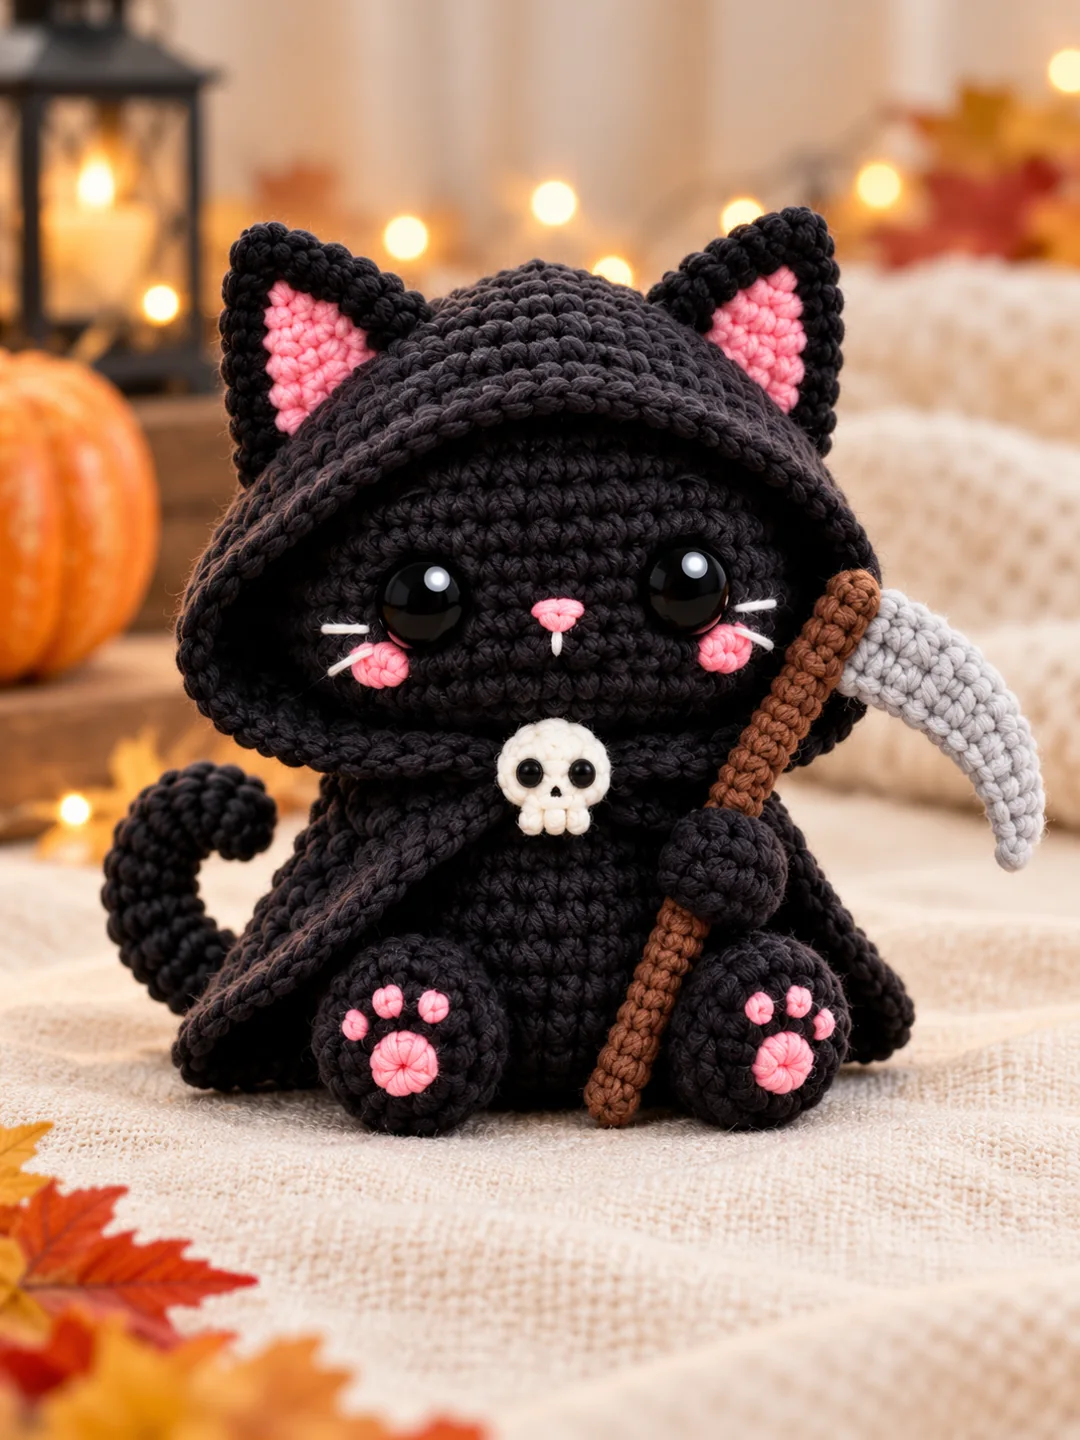
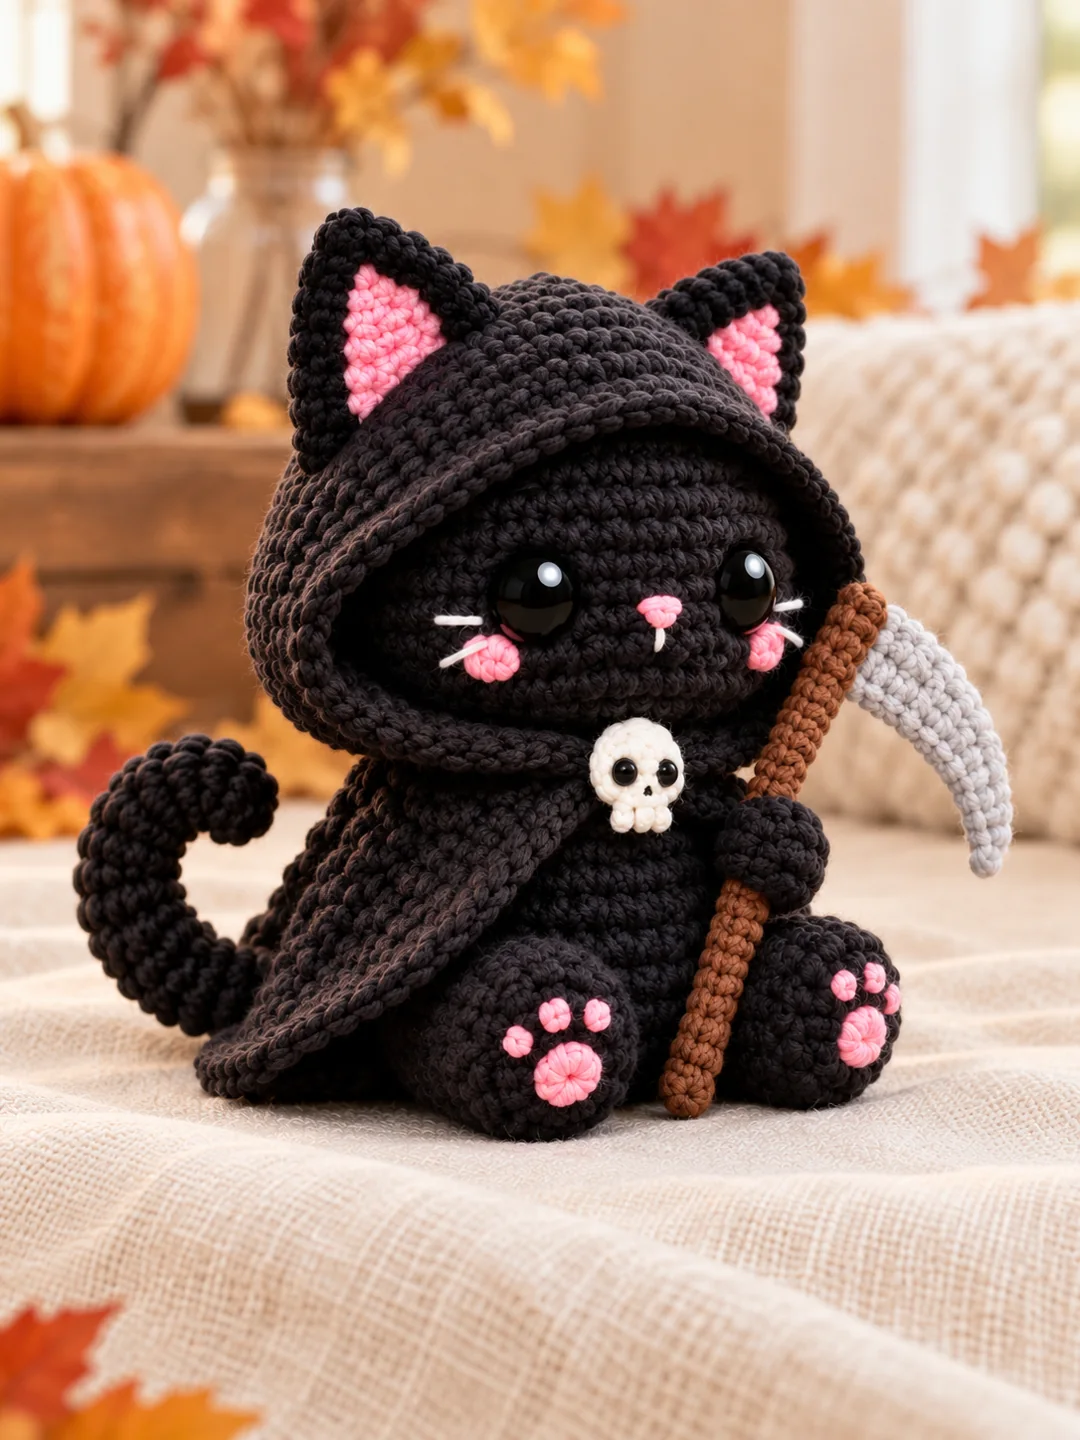
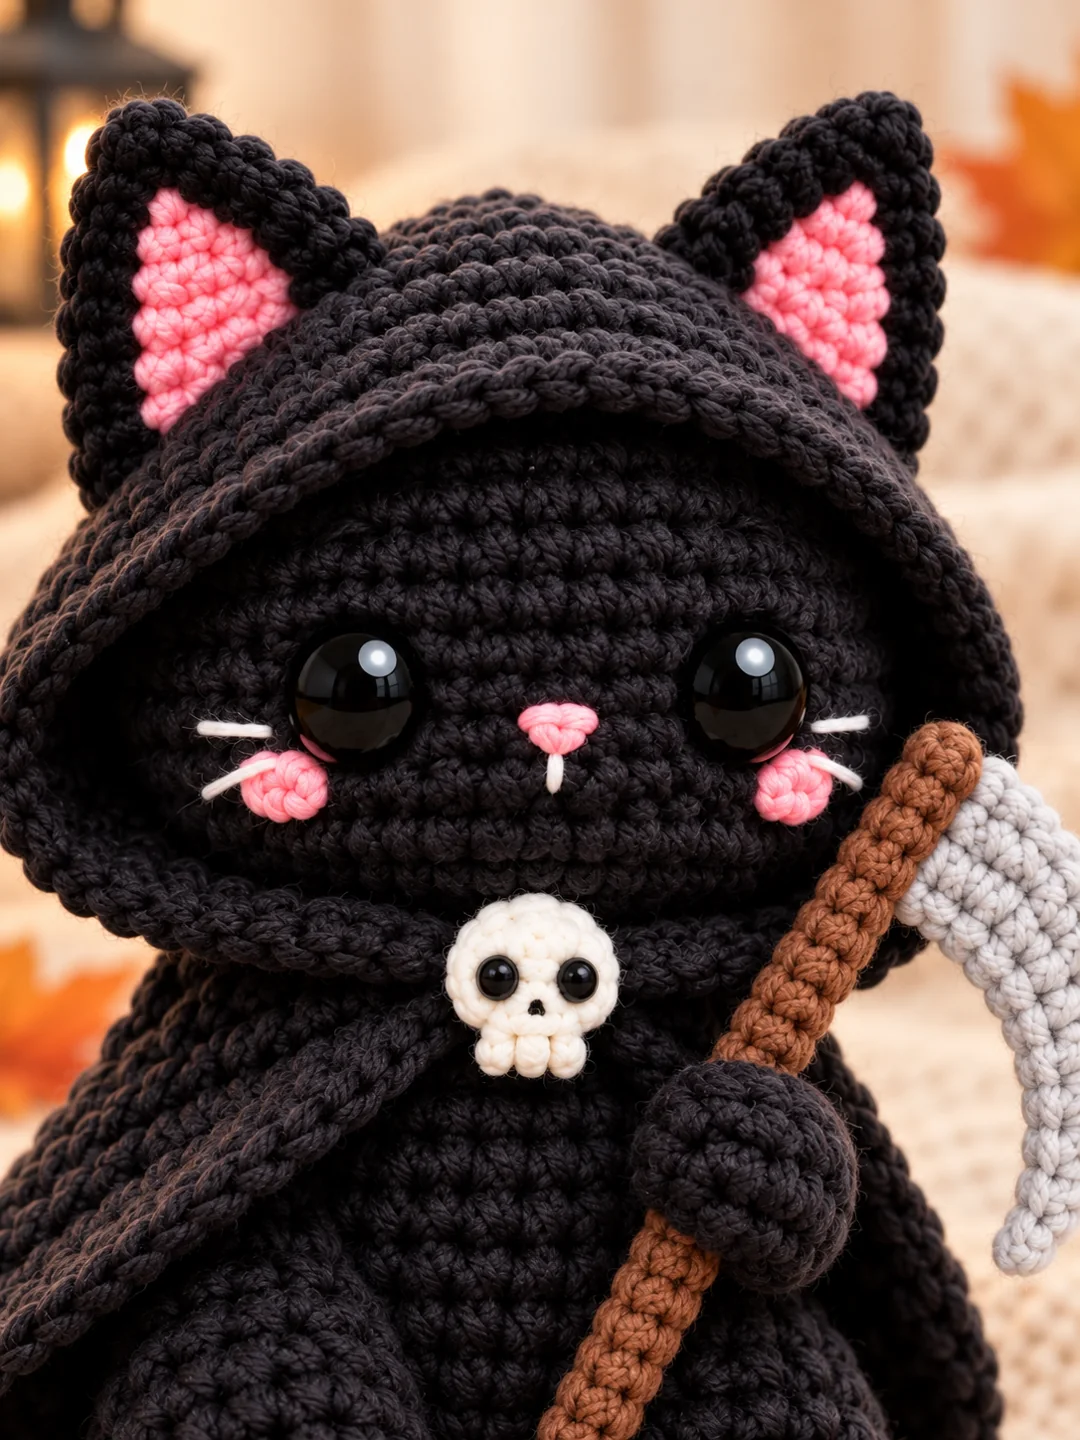
A tiny black cat in an oversized hood is a sweet way to bring a little spooky character to your Halloween shelf. This Grim Reaper Kitty has pink paw pads, a curled tail, a draped cape and a miniature yarn scythe. The white skull at the neckline adds the finishing touch without hiding that friendly little face.
Before you begin
The head and body are made separately so the head can stay round and oversized. A larger open cup forms the hood; double-layer triangular ears are attached through it. The cape is worked flat, while the soft scythe uses a narrow tube and two tapered blade panels. Make the main cat first, then fit and attach the clothing.
Skill level: Intermediate. US crochet terms. This project includes sewing and embroidery; it is not a no-sew pattern. Work slowly through the smaller details and pin every piece before attaching it.
Materials
- Smooth DK cotton or cotton-blend yarn in black, light gray, brown, pink and white. Keep all structural colors the same thickness. Have one 50 g ball of each main color and small amounts of the accents available; the amount used depends on your tension and chosen yarn.
- 2.5 mm crochet hook as a starting point; adjust for a dense fabric with no visible stuffing.
- Polyester fiberfill, tapestry needle, removable stitch markers, scissors and sewing pins.
- Black embroidery thread for mouths and small faces; pink thread or yarn for cheeks. Use embroidered eyes, or choose safety eyes that suit your actual head size and fit their washers before stuffing.
- Optional for adult display only: two tiny black beads for the skull’s eyes. All other facial details can be embroidered.
Abbreviations and pattern notes
MR = magic ring; ch = chain; sc = single crochet; hdc = half double crochet; dc = double crochet; inc = 2 sc in one stitch; dec = single crochet decrease over 2 stitches; sl st = slip stitch; st/sts = stitch/stitches; BLO/FLO = back/front loop only. A number in brackets is the stitch count at the end of that row or round.
Work in continuous rounds unless a row, join or turn is specifically stated. Mark the first stitch and move the marker every round. Turning chains do not count as stitches. In a repeat such as (3 sc, inc) × 6, work one sc in each of the next 3 stitches, then 2 sc in the next stitch; repeat this complete group 6 times. On closed stuffed pieces, use invisible decreases through the front loops of the next 2 stitches. On flat pieces, use a regular sc2tog through both loops.
Finished dimensions depend on yarn and tension. To estimate width, divide the widest round’s stitch count by your stitches per centimetre, then by 3.14. For example, a 48-stitch round at 5 stitches per centimetre is about 3.1 cm across before stuffing. Keep the same hook and yarn weight for fitted pieces; sew-on accessories can be positioned to suit your finished proportions. Count after every shaping round and add stuffing in small pieces rather than one large lump.
Grim Reaper Kitty pattern
Head
Black yarn.
- Rnd 1: 6 sc in a magic ring. (6 sts)
- Rnd 2: Inc in every stitch. (12 sts)
- Rnd 3: (1 sc, inc) × 6. (18 sts)
- Rnd 4: (2 sc, inc) × 6. (24 sts)
- Rnd 5: (3 sc, inc) × 6. (30 sts)
- Rnd 6: (4 sc, inc) × 6. (36 sts)
- Rnd 7: (5 sc, inc) × 6. (42 sts)
- Rnd 8: (6 sc, inc) × 6. (48 sts)
- Rnds 9–16: Sc around in each round. (48 sts)
Before decreasing, place the eyes between Rounds 12 and 13 with 9 visible stitches between their inner edges. Use 8–10 mm eyes only if they suit your actual fabric. Check both positions from the front before securing washers. For embroidered eyes, mark the same positions with scrap yarn and embroider after stuffing. Begin stuffing evenly before decreasing.
Head — close the shape
Continue the same yarn.
- Rnd 17: (6 sc, dec) × 6. (42 sts)
- Rnd 18: (5 sc, dec) × 6. (36 sts)
- Rnd 19: (4 sc, dec) × 6. (30 sts)
- Rnd 20: (3 sc, dec) × 6. (24 sts)
- Rnd 21: (2 sc, dec) × 6. (18 sts)
- Rnd 22: (1 sc, dec) × 6. (12 sts)
- Rnd 23: Dec × 6. (6 sts)
Add the final small pieces of stuffing before the last round. Fasten off with a tail. Thread it through the front loops of the final 6 stitches, pull closed, secure and bury the end. Keep the magic ring at the crown and the closing point underneath.
Body
Black yarn.
- Rnd 1: 6 sc in a magic ring. (6 sts)
- Rnd 2: Inc in every stitch. (12 sts)
- Rnd 3: (1 sc, inc) × 6. (18 sts)
- Rnd 4: (2 sc, inc) × 6. (24 sts)
- Rnd 5: (3 sc, inc) × 6. (30 sts)
- Rnd 6: (4 sc, inc) × 6. (36 sts)
- Rnds 7–12: Sc around in each round. (36 sts)
- Rnd 13: (4 sc, dec) × 6. (30 sts)
- Rnd 14: Sc around. (30 sts)
- Rnd 15: (3 sc, dec) × 6. (24 sts)
- Rnd 16: Sc around. (24 sts)
- Rnd 17: (2 sc, dec) × 6. (18 sts)
Stuff with a slightly flattened base. Leave the 18-stitch neck open and a long sewing tail. Sew the neck to the lower center of the completed head, using a second pass around the seam for support.
Seated feet — make 2
Black yarn.
- Rnd 1: 6 sc in a magic ring. (6 sts)
- Rnd 2: Inc in every stitch. (12 sts)
- Rnd 3: (1 sc, inc) × 6. (18 sts)
- Rnds 4–6: Sc around in each round. (18 sts)
- Rnd 7: (1 sc, dec) × 6. (12 sts)
- Rnd 8: Sc around. (12 sts)
Stuff the toes only. Flatten the opening and make 6 sc through both layers, pairing the front and back stitches. Fasten off with a tail. Sew at the lower front sides of the body with the round toes pointing forward.
Arms — make 2
Black yarn.
- Rnd 1: 6 sc in a magic ring. (6 sts)
- Rnd 2: Inc around. (12 sts)
- Rnds 3–4: Sc around in each round. (12 sts)
- Rnd 5: (2 sc, dec) × 3. (9 sts)
- Rnds 6–10: Sc around in each round. (9 sts)
Lightly stuff the hand; leave the upper arm empty. Fasten off, flatten and sew the opening shut with a whipstitch. Sew just below the neck, angling the hands toward the accessory if there is one.
Pink paw pads — make 2
Pink yarn.
- Rnd 1: 6 sc in a magic ring. (6 sts)
Slip stitch in the next stitch; fasten off with a sewing tail. Sew one disc to the outward-facing toe of each foot. Above each disc embroider 3 small pink oval toe pads, using 3 satin stitches per oval. Keep all pink details on the face of the foot, not underneath where the kitty sits.
Curled tail
Black yarn.
- Rnd 1: 6 sc in a magic ring. (6 sts)
- Rnd 2: (1 sc, inc) × 3. (9 sts)
- Rnds 3–24: Sc around in each round. (9 sts)
Add a very small amount of stuffing while working; keep the last 3 rounds empty. Fasten off with a long tail. Run a separate black shaping thread through stitches along one side of the first 8 rounds, draw up gently to curl the tip and secure it. Flatten the open base and sew it to the lower back of the body around Rounds 5–7. Curve it outward so it remains visible beside the cape; tack the middle of the curve to the body if it needs support. Do not add wire.
Hood
Black yarn. The magic ring sits at the BACK of the head, not at the crown.
- Rnd 1: 6 sc in a magic ring. (6 sts)
- Rnd 2: Inc in every stitch. (12 sts)
- Rnd 3: (1 sc, inc) × 6. (18 sts)
- Rnd 4: (2 sc, inc) × 6. (24 sts)
- Rnd 5: (3 sc, inc) × 6. (30 sts)
- Rnd 6: (4 sc, inc) × 6. (36 sts)
- Rnd 7: (5 sc, inc) × 6. (42 sts)
- Rnd 8: (6 sc, inc) × 6. (48 sts)
- Rnd 9: (7 sc, inc) × 6. (54 sts)
- Rnds 10–14: Sc around in each round. (54 sts)
Slip stitch to the next stitch and fasten off, leaving a long sewing tail. The opening stays open. Place the head inside the hood with its face looking through the 54-stitch opening. The upper rim should sit above the eyes and the lower rim under the chin. Before fastening permanently, check the fit: if the hood covers the face, undo one plain round; if it does not reach the chin, add one plain round. Repeat that one-round adjustment only as needed. Never decrease the opening closed. Tack the hood to the head at the back, above each temple, and under the chin. Do not sew across the visible face.
Outer ears — make 4 triangles
Black yarn. Two triangles form each double-layer ear.
- Row 1: Ch 2; sc in the second chain. (1 st)
- Row 2: Ch 1, turn; inc. (2 sts)
- Row 3: Ch 1, turn; inc in both stitches. (4 sts)
- Row 4: Ch 1, turn; inc, 2 sc, inc. (6 sts)
- Row 5: Ch 1, turn; inc, 4 sc, inc. (8 sts)
- Row 6: Ch 1, turn; sc across. (8 sts)
- Row 7: Ch 1, turn; inc, 6 sc, inc. (10 sts)
Fasten off each triangle. Pair the triangles with their wrong sides together and whipstitch the two sloping edges. Leave the 10-stitch base edges open for attachment; do not stuff. The first row is the pointed tip.
Pink inner ears — make 2
Pink yarn.
- Row 1: Ch 2; sc in the second chain. (1 st)
- Row 2: Ch 1, turn; inc. (2 sts)
- Row 3: Ch 1, turn; inc in both stitches. (4 sts)
- Row 4: Ch 1, turn; sc across. (4 sts)
- Row 5: Ch 1, turn; inc, 2 sc, inc. (6 sts)
Fasten off with a tail. Sew one pink triangle to the front of each black ear, leaving a visible black border. With the hood already positioned, pin the ears symmetrically on its upper sides, about 10 hood stitches apart across the top. Sew through both base layers, the hood and the head beneath. This layered attachment makes the ears appear to emerge from the hood without leaving unfinished holes.
Cape
Black yarn.
- Row 1: Ch 25; sc in the second chain and across. (24 sts)
- Row 2: Ch 1, turn; (2 sc, inc) × 8. (32 sts)
- Row 3: Ch 1, turn; (3 sc, inc) × 8. (40 sts)
- Row 4: Ch 1, turn; (4 sc, inc) × 8. (48 sts)
- Rows 5–11: Ch 1, turn; sc across. (48 sts)
Fasten off. With the right side facing you, rejoin yarn at a front corner and sc evenly along both front edges and the bottom, using 1 sc per row end and 2 sc at each bottom corner. Keep the top neck edge unedged. Wrap around the shoulders, leave the front open and sew the two upper corners to the body. This is a sewn-on cape, so long neck ties are unnecessary.
Position the cape’s starting-chain edge around the neck. The front edges angle outward so the chest, hands and feet remain visible. Sew the rear neck edge to the underside of the hood. Leave the hem free to drape over the back and beside the feet; arrange the tail outside it.
Tiny skull charm
White yarn; use embroidery thread for its face.
- Rnd 1: 6 sc in a magic ring. (6 sts)
- Rnd 2: Inc in every stitch. (12 sts)
Slip stitch in the next stitch; fasten off with a sewing tail. At the lower edge, rejoin white yarn in one stitch. Ch 2 and slip stitch into that same stitch for the first tooth. Slip stitch into the next base stitch, ch 2 and slip stitch into that same stitch for the second tooth. Repeat once more in the next base stitch for a total of 3 teeth. Fasten off. Embroider 2 black eye sockets and an upside-down V for the nose. Sew the skull flat at its stated position; it is an applique, not a loose bead.
Attach the skull over the two upper cape corners, just under the chin. Embroidered sockets keep it entirely stitched. For an adult display, two small black beads may replace the embroidered sockets; include them in your materials and sew each securely before attaching the charm.
Make the soft scythe
Scythe handle
Brown yarn.
- Rnd 1: 5 sc in a magic ring. (5 sts)
- Rnds 2–30: Sc around in each round. (5 sts)
Add very small wisps of stuffing every few rounds using a blunt tool. Keep the tube narrow, firm and flexible. Fasten off and thread the tail through all 5 final front loops to gather the top closed. The handle is a soft prop; it does not need a dowel or wire.
Blade panels — make 2
Light gray yarn. Work from the wide attachment end toward the point.
- Row 1: Ch 7; sc in the second chain and each remaining chain. (6 sts)
- Rows 2–4: Ch 1, turn; sc across. (6 sts)
- Row 5: Ch 1, turn; 4 sc, dec. (5 sts)
- Rows 6–7: Ch 1, turn; sc across. (5 sts)
- Row 8: Ch 1, turn; 3 sc, dec. (4 sts)
- Rows 9–10: Ch 1, turn; sc across. (4 sts)
- Row 11: Ch 1, turn; 2 sc, dec. (3 sts)
- Rows 12–13: Ch 1, turn; sc across. (3 sts)
- Row 14: Ch 1, turn; 1 sc, dec. (2 sts)
- Row 15: Ch 1, turn; sc across. (2 sts)
- Row 16: Ch 1, turn; dec. (1 st)
Fasten off. Place the two panels wrong sides together and whipstitch all around their edges with gray yarn. Leave them unstuffed. Run another gray thread along one long edge, catching each row end; gently shorten that edge until the blade forms a crescent. Secure the shaping thread and smooth the opposite edge into a convex curve. The broad Row 1 end attaches to the upper side of the brown handle, just below its tip. Sew through both blade layers and several rounds of the handle, with the blade extending outward and curving downward.
Embroider the face
Cheeks — make 2
Pink yarn.
- Rnd 1: 6 sc in a magic ring. (6 sts)
Slip stitch in the next stitch; fasten off with a sewing tail. Sew just below the outside edge of each eye. Alternatively use 3 short satin stitches for each cheek.
Center a tiny pink upside-down triangle between the eyes, about one round below them. Fill it with 3 or 4 short satin stitches. Add one short white vertical stitch below the nose for the mouth detail. With white embroidery thread, make two short whiskers on each cheek, angling one slightly upward and one outward. Anchor both ends of every whisker against the crochet surface; do not leave long loose thread ends. Keep the whiskers clear of the pink cheek discs.
Put your Grim Reaper Kitty together
- Check that the head is centered on the neck and the body sits securely between its two feet. Add another pass of sewing around the neck if the head tips.
- Adjust the hood so both eyes, the pink nose and cheeks remain completely visible. The ears should rise above the hood’s upper edge.
- Drape the cape behind the arms, keeping its two front edges apart. Secure the skull at the throat and arrange the tail outside the hem.
- Rest the bottom of the scythe beside one foot. Angle the handle diagonally across that side of the body, keeping the blade away from the face.
- Wrap one hand around the handle and stitch it to the tube in two places. Add a hidden securing stitch between the lower handle and the side of the foot. The other arm can sit alongside the body.
- Turn the kitty around and inspect the back seam, tail attachment and cape hem. Bury the remaining yarn tails and gently reshape the feet on a flat surface.
Helpful tips and questions
How do I keep the hood from covering the eyes?
Fit the hood before sewing the ears. Its magic ring belongs behind the head and its open rim frames the face. Adjust only the number of plain rounds, one at a time, while keeping all 54 opening stitches. A few discreet anchoring stitches hold the brow above the eyes.
Why does my scythe blade look straight?
The taper supplies the pointed outline, while the shaping thread supplies the curve. Shorten one sewn long edge gently until the tip turns downward. If the blade puckers, release a little tension; it should form a smooth crescent rather than a tightly gathered ruffle.
How can I make the black stitches easier to see?
Use a light-colored cloth beneath your work and direct a bright lamp onto the stitches. Put contrasting markers at the start of each round and in the face center. Smooth yarn is easier to count than fuzzy yarn for this project.
Can I make this without the scythe?
Yes. Leave the hands beside the body and keep the hood, cape and skull for a dressed-up black cat. The scythe is a separately sewn accessory, so removing it does not change the body construction.
How do I keep the tail curled?
Use very light stuffing and secure the curved tip with the shaping thread described in the tail section. A hidden tack between the middle of the tail and the body keeps the silhouette steady without an internal wire.
Can I change the yarn weight?
Yes, but change the hook with it and use the same weight throughout connected pieces. A thicker yarn makes the whole project larger; changing only one fitted piece can cause a mismatch. Embroidery thread is useful for details that become too bulky in the main yarn.
What should I check before sewing?
Set the pieces together on a table and compare the front and side silhouette. The face, main body and largest accessory determine the character first. Adjust the placement while the parts are pinned, then attach the smaller embellishments. Photograph the pinned arrangement if you want a useful guide while sewing.
Finishing and care
Check each seam by gently tugging the attached piece, then secure and bury every yarn end. Shape the base on a flat surface and keep the face centered while the stuffing settles. Spot-clean according to your yarn’s care label, blot gently and air-dry. Do not iron safety eyes or plastic decorations.
This detailed miniature is intended as a seasonal display piece. Small accessories, plastic eyes, buttons and loose fringe are not suitable for children under three. Embroider small details and omit detachable pieces whenever child access is possible; doing so does not by itself certify a handmade item as toy-safe.
Enjoy arranging your finished grim reaper kitty with your other handmade Halloween decorations. Changing a band, bow or accent color is an easy way to make a coordinating set while keeping the construction the same.