Poppy the Mini Pumpkin Buddy: Free Crochet Pattern
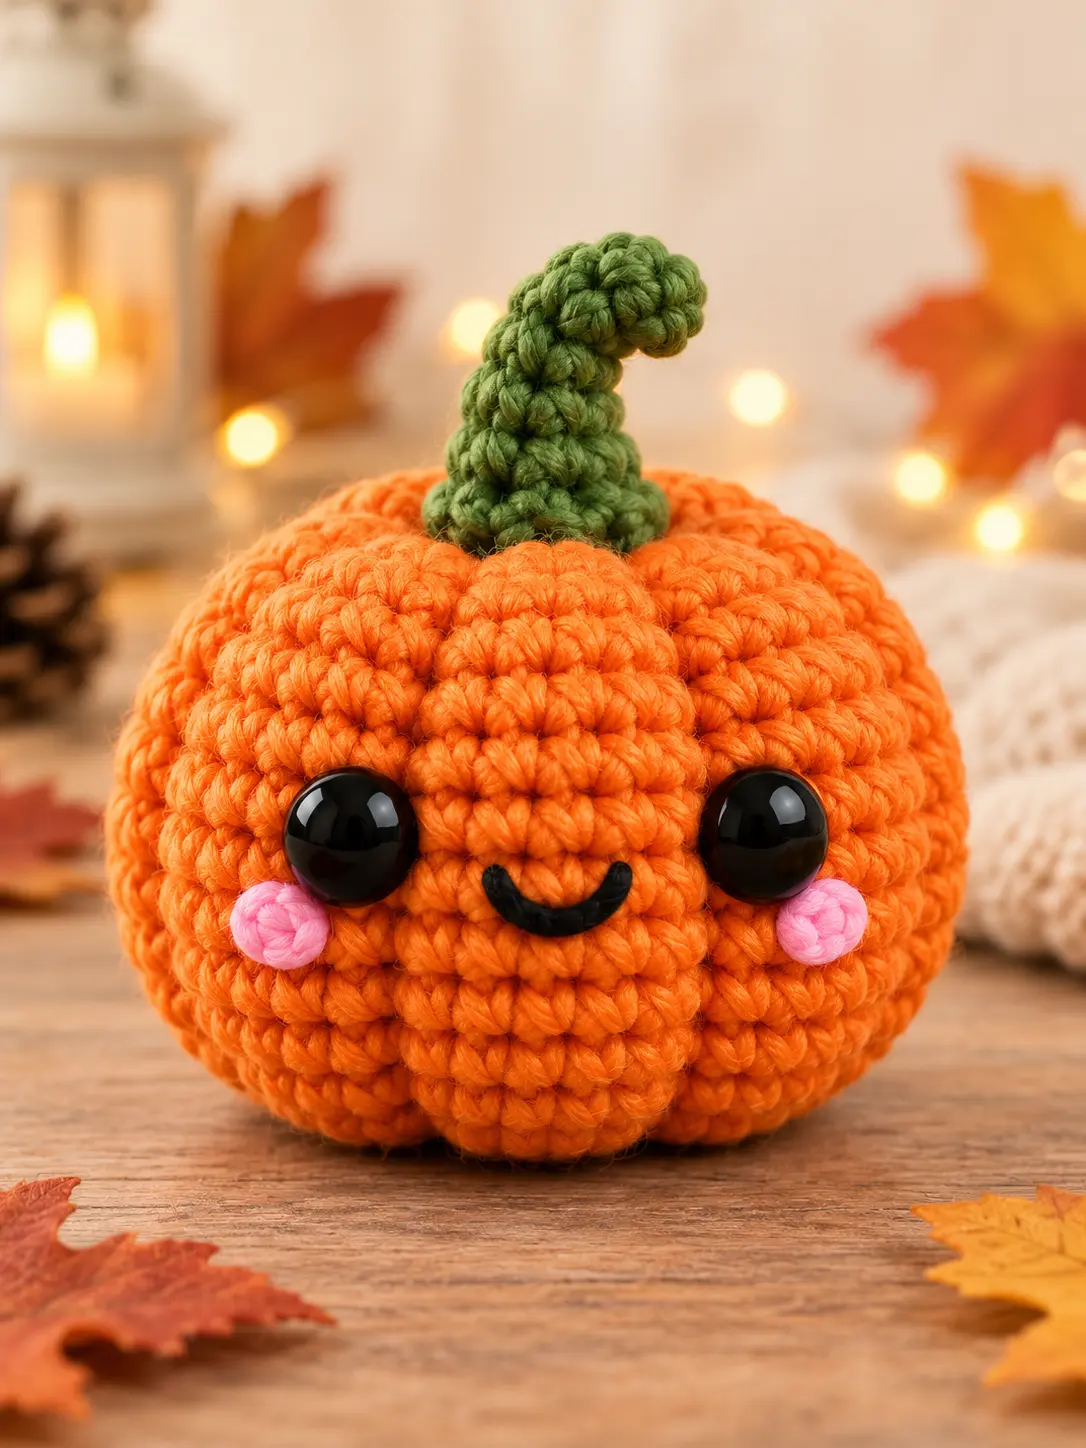
Poppy is a small crochet pumpkin with a wide round body, six deep grooves, a curved green stem, shiny black eyes, pink cheeks, and a tiny embroidered smile. Her simple fall colors and friendly face make her a lovely handmade decoration for autumn.
This free pumpkin amigurumi pattern is made from one stuffed orange body, one green stem, two flat cheeks, and a few embroidered details. After the body is closed, long strands of orange yarn are wrapped around it to create the six pumpkin sections.
The instructions below were corrected to match the finished crochet shown in the photos. The body reaches 42 stitches for a wide pumpkin shape, the stem grows gradually from 4 to 10 stitches, and the groove placement is divided evenly around the body.
About This Mini Pumpkin Crochet Pattern
Poppy is a quick seasonal project for an adventurous beginner. The main piece uses basic amigurumi stitches, and the shape comes from simple increases and decreases. The only unusual step is the yarn sculpting, which is explained carefully below.
Use your finished pumpkin on a shelf, desk, mantel, tiered tray, party table, or Thanksgiving display. It also makes a sweet handmade gift, craft-market item, or autumn ornament when a hanging loop is added.
Skill Level
Easy to intermediate beginner. You should know how to make a magic ring, single crochet, increase, invisible decrease, work in continuous rounds, embroider a simple face, and sew small crochet pieces together.
Finished Size
Approximately 9–10 cm (3.5–4 inches) tall, including the curved stem, and about 11 cm (4.25 inches) wide when made with DK or light worsted yarn and a 2.5 mm hook. Yarn thickness, hook size, tension, stuffing, and groove shaping can change the final measurement.
Materials
- Orange DK or light worsted yarn for the pumpkin and grooves
- Dark olive-green yarn for the stem
- Small amount of pink yarn for the cheeks
- Black embroidery thread or thin black yarn for the smile
- Two 10 mm black safety eyes
- 2.5 mm crochet hook
- Polyester fiberfill
- Long yarn needle for sculpting and assembly
- Stitch marker
- Scissors
- Six sewing pins, optional but helpful for groove placement
Abbreviations
This pattern uses US crochet terms.
- dec: invisible single crochet decrease
- FO: fasten off
- inc: 2 single crochet stitches in one stitch
- MR: magic ring
- rnd: round
- sc: single crochet
- sl st: slip stitch
- st/sts: stitch/stitches
Pattern Notes
- Work the body and stem in continuous spiral rounds.
- Place a marker in the first stitch and move it after every round.
- The number in parentheses is the total stitch count.
- Repeat the instructions inside parentheses the stated number of times.
- Use a hook that makes firm fabric so the stuffing does not show.
- Stuff evenly, but leave enough softness for the sculpting yarn to form grooves.
- Make the cheeks and face before shaping the grooves if you want the easiest sewing access.
How to Make an Invisible Decrease
Insert the hook through the front loop of the next stitch. Insert it through the front loop of the following stitch. Yarn over and pull through the first two loops. Yarn over again and pull through the remaining two loops. This makes a neat decrease with fewer visible gaps.
1. Wide Pumpkin Body
Use orange yarn.
- Rnd 1: Make 6 sc in a MR. (6)
- Rnd 2: Inc in every stitch around. (12)
- Rnd 3: (1 sc, inc) × 6. (18)
- Rnd 4: (2 sc, inc) × 6. (24)
- Rnd 5: (3 sc, inc) × 6. (30)
- Rnd 6: (4 sc, inc) × 6. (36)
- Rnd 7: (5 sc, inc) × 6. (42)
- Rnds 8–12: Sc in every stitch around. (42)
Place the safety eyes between Rounds 10 and 11. Leave eight visible stitches between the eyes. The face should sit low on the body because the stem and top grooves need open space above it. Check the position carefully before attaching the safety backs.
- Rnd 13: (5 sc, dec) × 6. (36)
- Rnd 14: (4 sc, dec) × 6. (30)
- Rnd 15: (3 sc, dec) × 6. (24)
- Rnd 16: (2 sc, dec) × 6. (18)
Begin stuffing the pumpkin. Add small pieces around the sides first, then fill the center. Keep the body firm enough to hold its shape, but do not pack it so tightly that the shaping yarn cannot press into the surface.
- Rnd 17: (1 sc, dec) × 6. (12)
- Rnd 18: Dec around. (6)
Finish stuffing. Cut the yarn and leave a tail. Thread the tail through the front loops of the final six stitches, pull the opening closed, secure it, and hide the end inside the body.
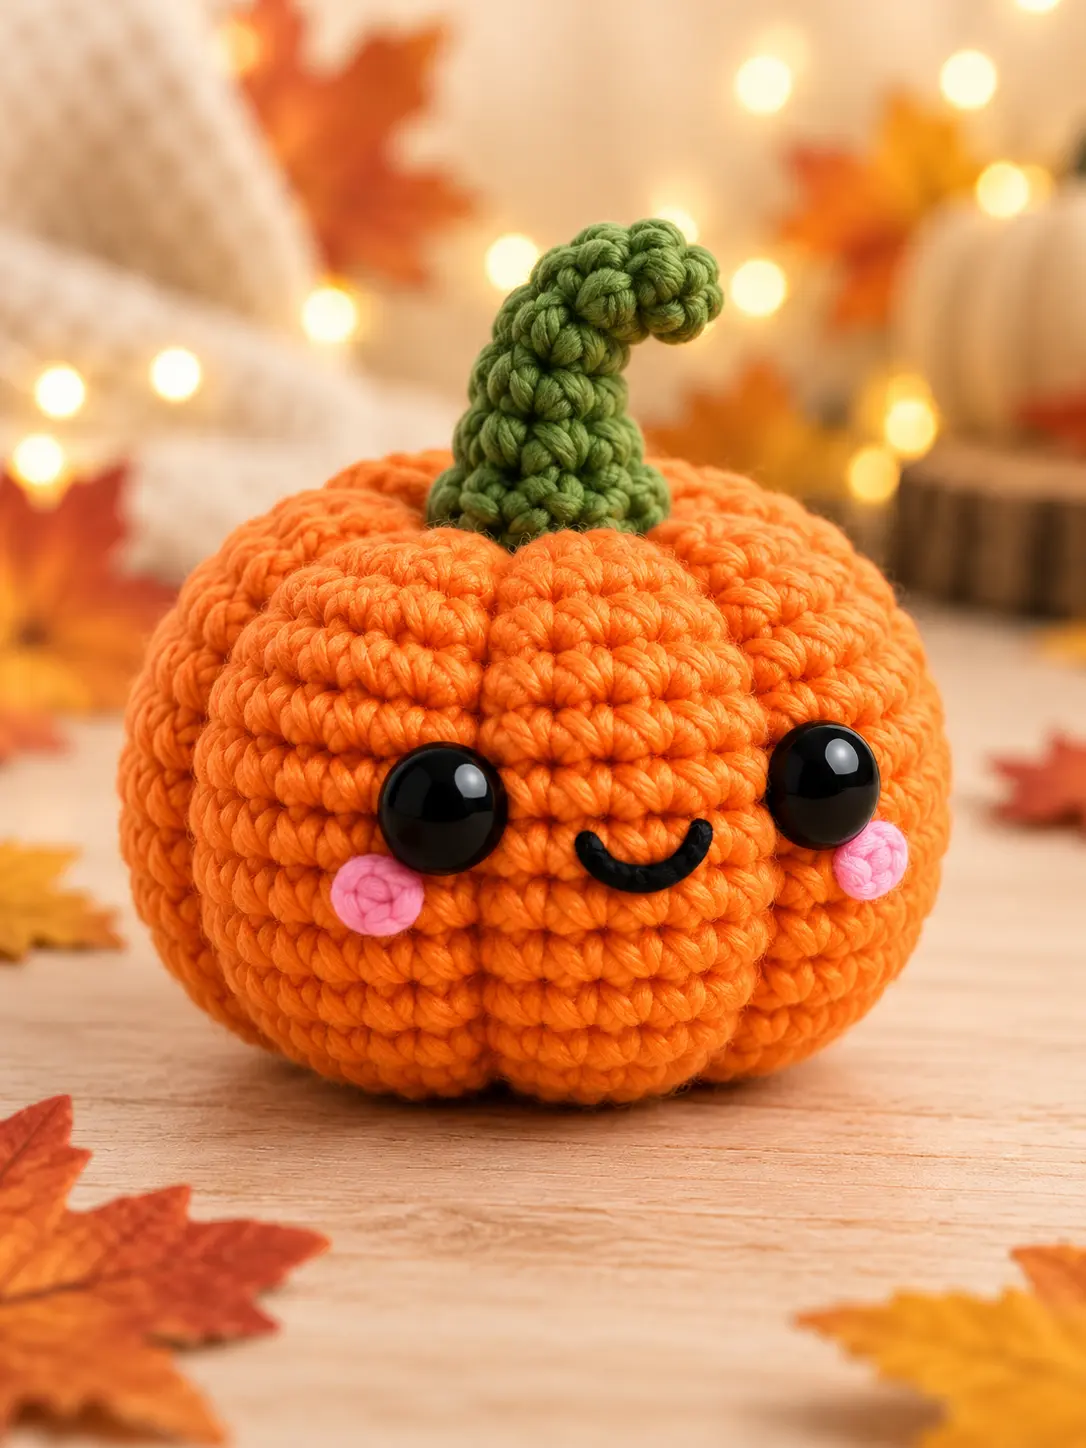
2. Curved Green Stem
Use dark olive-green yarn. Work from the narrow tip down to the wider base.
- Rnd 1: Make 4 sc in a MR. (4)
- Rnd 2: Sc in every stitch around. (4)
- Rnd 3: (1 sc, inc) × 2. (6)
- Rnd 4: Sc in every stitch around. (6)
- Rnd 5: (2 sc, inc) × 2. (8)
- Rnds 6–7: Sc in every stitch around. (8)
- Rnd 8: (3 sc, inc) × 2. (10)
Fasten off and leave a long sewing tail. Do not stuff the stem, or add only a tiny amount to the base. Bend the narrow end gently to one side. If it will not stay curved, use a short green yarn stitch to hold the tip against the side of the stem.
3. Pink Cheeks — Make 2
Use pink yarn.
- Rnd 1: Make 6 sc in a MR. Join to the first stitch with a sl st. (6)
Fasten off and leave a sewing tail. Keep each little circle flat. Sew one cheek below and slightly outside each eye. Make sure the two cheeks are level before securing the yarn ends.
4. Embroidered Smile
Use black embroidery thread or thin black yarn. Make a short curved smile centered between the eyes. Add one tiny holding stitch at the bottom center of the curve so it stays rounded. Keep the smile small and low for the same friendly expression shown in the photos.
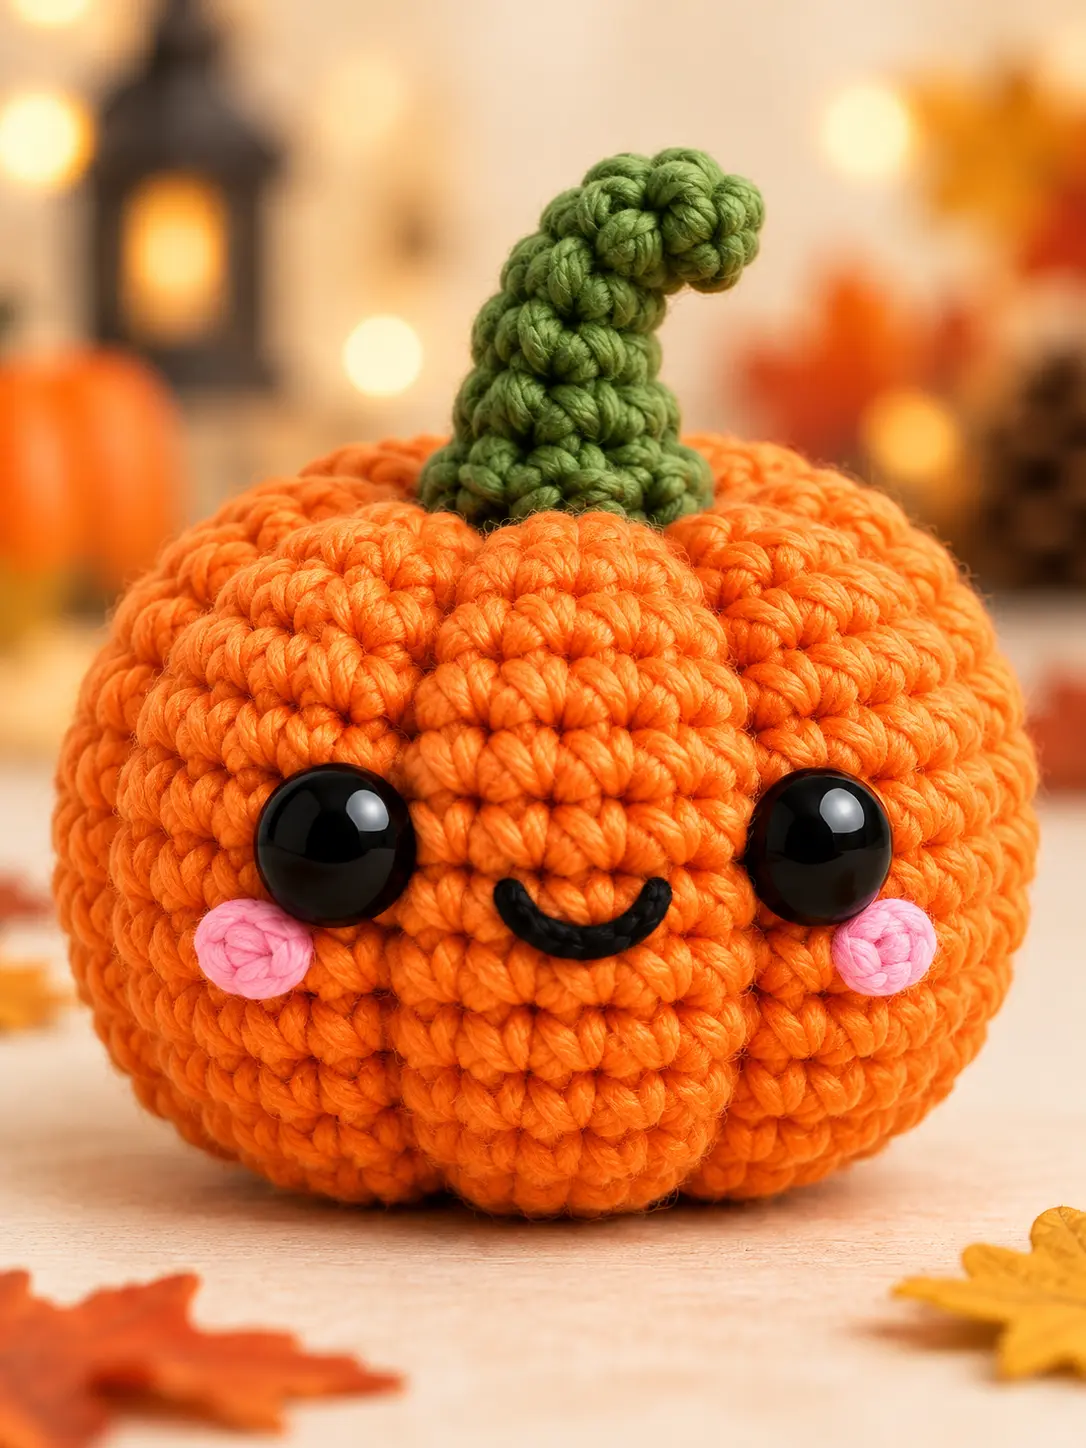
5. Sculpting Six Pumpkin Grooves
Cut a long strand of orange yarn, about five times the height of the pumpkin. Thread it onto a long yarn needle. For stronger grooves, use the strand doubled. Do not use wire or fishing line.
- Find the center of the closed bottom and secure the orange yarn there.
- Push the needle straight through the stuffed body and bring it out at the top center.
- Wrap the yarn down the outside of the pumpkin along the first groove line.
- Insert the needle at the bottom center and bring it through the body to the top center again.
- Pull gently until the yarn settles into the stitches and creates a clear groove.
- Repeat around the body, placing each new wrap about seven stitches from the previous wrap at the widest round.
- Make six wraps in total. Compare all six sections before tightening the final wrap.
- Secure the yarn at the bottom center and hide the end inside the pumpkin.
Pull each wrap only until the pumpkin section becomes rounded. If one groove is much deeper than the others, loosen it slightly before securing the yarn.
Final Assembly
- Place the pumpkin on a flat surface and arrange the six grooves evenly.
- Pin the wide 10-stitch base of the green stem over the top center.
- Sew around the stem base with small green stitches, covering the place where the sculpting strands meet.
- Curve the stem gently and secure the bend if needed.
- Check the eyes, cheeks, smile, grooves, and stem from every side.
- Hide all remaining yarn ends and press the base gently so the pumpkin sits without rolling.
Stitch-Count Check
The body increases in multiples of six from 6 to 42 stitches: 6, 12, 18, 24, 30, 36, and 42. It stays at 42 stitches for five rounds, then decreases through 36, 30, 24, 18, 12, and 6. Every shaping round contains six complete repeats.
The widest round has 42 stitches. Dividing 42 by six gives seven, so placing each sculpting wrap about seven stitches apart creates six balanced pumpkin sections. The stem counts also work evenly: 4, 4, 6, 6, 8, 8, 8, and 10.
Helpful Tips for the Best Result
Do Not Overstuff
A very hard body will resist the sculpting yarn. Stop stuffing when the pumpkin feels firm but still gives slightly when pressed with a finger.
Mark the Six Sections First
Place six pins around the widest part before sculpting. Keep about seven stitches between the pins. This small step helps every section stay close to the same width.
Tighten the Grooves Slowly
Make all six wraps before doing the final tightening. Work around the pumpkin a second time and adjust each strand until the grooves have equal depth.
Keep the Face Between Grooves
Place one groove on each side of the face rather than directly through an eye or cheek. The center front section should frame the smile neatly.
Shape the Stem by Hand
The unstuffed upper stem bends more easily. Curve it gently instead of pulling hard, then add one hidden stitch if the tip needs extra support.
Ways to Customize Your Pumpkin Buddy
- Use cream, mustard, rust, sage, brown, or dusty pink yarn for the body.
- Change the cheeks to peach or leave them off for a simpler face.
- Embroider closed eyes for a sleepy pumpkin.
- Add a small crochet leaf beside the stem.
- Make a thin hanging loop for an autumn ornament.
- Use blanket yarn and a larger hook for a soft plush pumpkin.
- Use thin cotton yarn for a keychain-sized version.
Frequently Asked Questions
Why does my pumpkin look like a ball?
The round body becomes a pumpkin after the six sculpting strands are added. Pull each strand gently and evenly to flatten the top and bottom while forming the vertical grooves.
Why are my sections uneven?
The wraps may not be spaced evenly or one strand may be tighter. Mark six positions about seven stitches apart and adjust all the wraps before tying the final knot.
Can I make the pumpkin without safety eyes?
Yes. Embroider the eyes securely with black yarn. This is the safer choice for a pumpkin that will be handled by a young child.
Can I make a shorter stem?
Yes. Stop after Round 6 and fasten off. The stem will still have a gently wider base, but its tip will be less curved.
Can I use thicker yarn?
Yes. Choose a hook that creates tight fabric and use larger safety eyes that suit the new size. Thicker yarn will make a wider, taller pumpkin and will require more stuffing.
How do I help the pumpkin sit flat?
Do not overfill the last rounds. After closing and sculpting, press the bottom center inward with your thumb and place the pumpkin on a flat table while shaping the six sections.
Care and Safety
Poppy is designed as a small decorative fall collectible. Plastic safety eyes and sewn pieces may become choking hazards. Keep the finished pumpkin away from children under three and pets, or replace the eyes with secure embroidery.
Spot-clean with cool water and mild soap. Press out moisture with a towel and dry flat. Reshape the sections and stem while the yarn is still damp. Keep all yarn decorations away from candles, fireplaces, heaters, and hot bulbs.
Your Mini Pumpkin Buddy Is Finished
Arrange the six sections, lift the curved stem, and give the round body one final shape. Poppy is ready to bring a little handmade warmth to your autumn display.
SEO Details
SEO title: Poppy Mini Pumpkin Buddy Free Crochet Pattern
Meta description: Crochet Poppy, a friendly mini pumpkin with six shaped grooves, a curved green stem, pink cheeks, and a tiny smile. Includes a complete free pattern.
Suggested URL slug: poppy-mini-pumpkin-buddy-free-crochet-pattern
Main keyword: mini pumpkin crochet pattern
Related keywords: pumpkin amigurumi pattern, easy crochet pumpkin, fall crochet pattern, free Halloween crochet pattern