Frankie Moo the Frankenstein Cow: Free Halloween Crochet Pattern
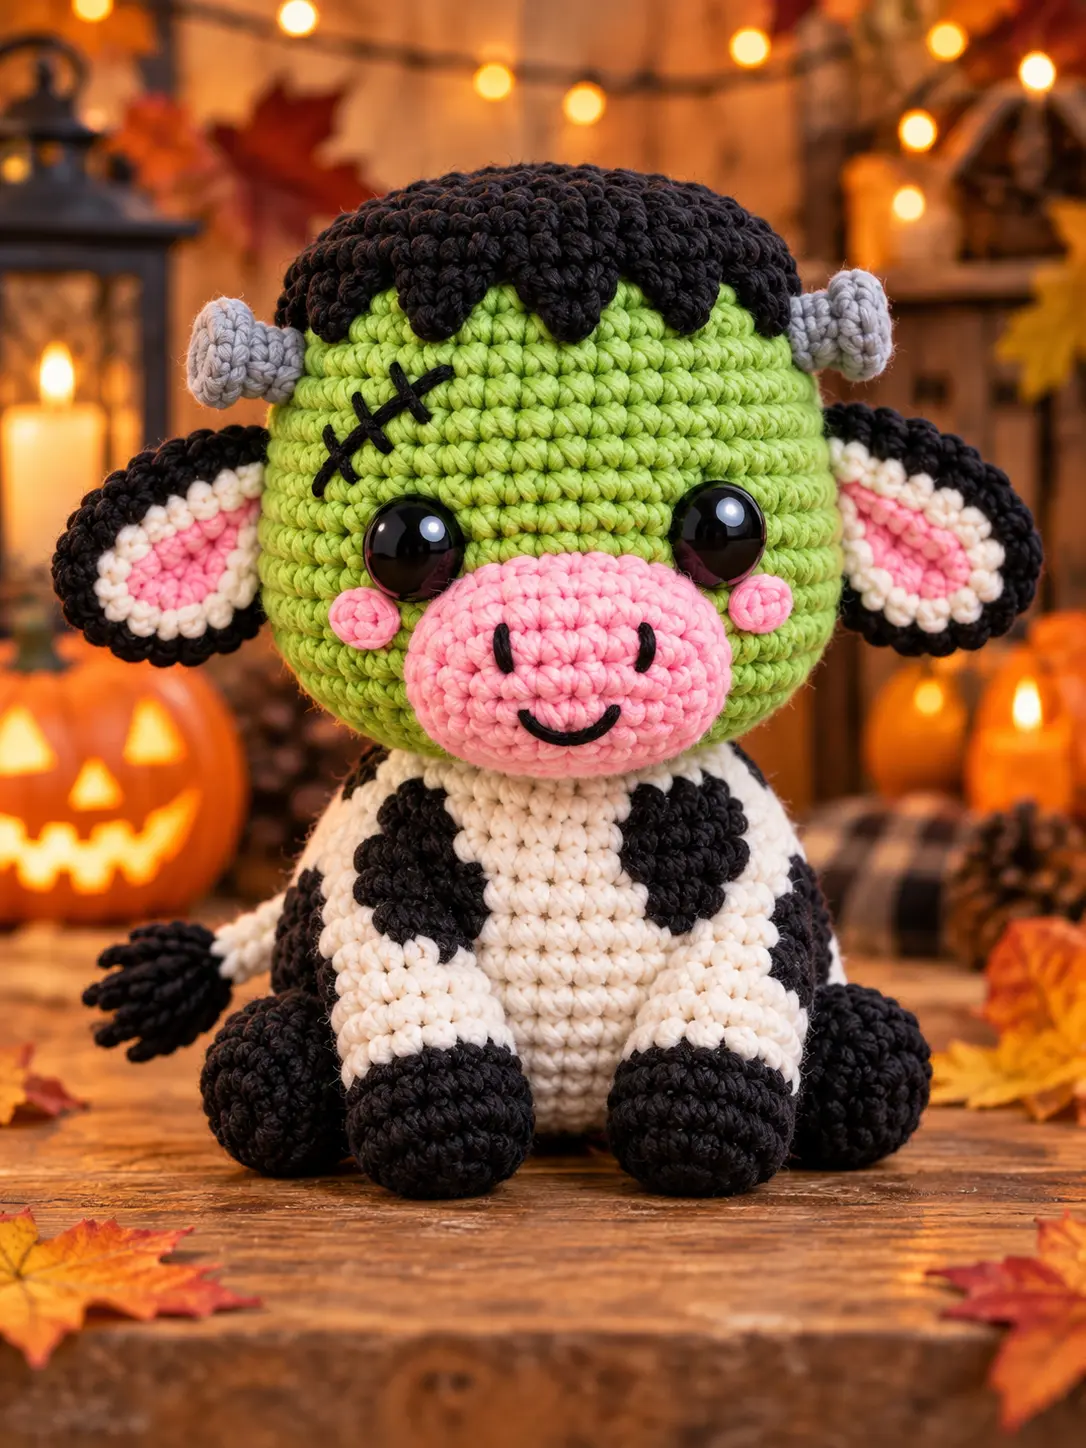
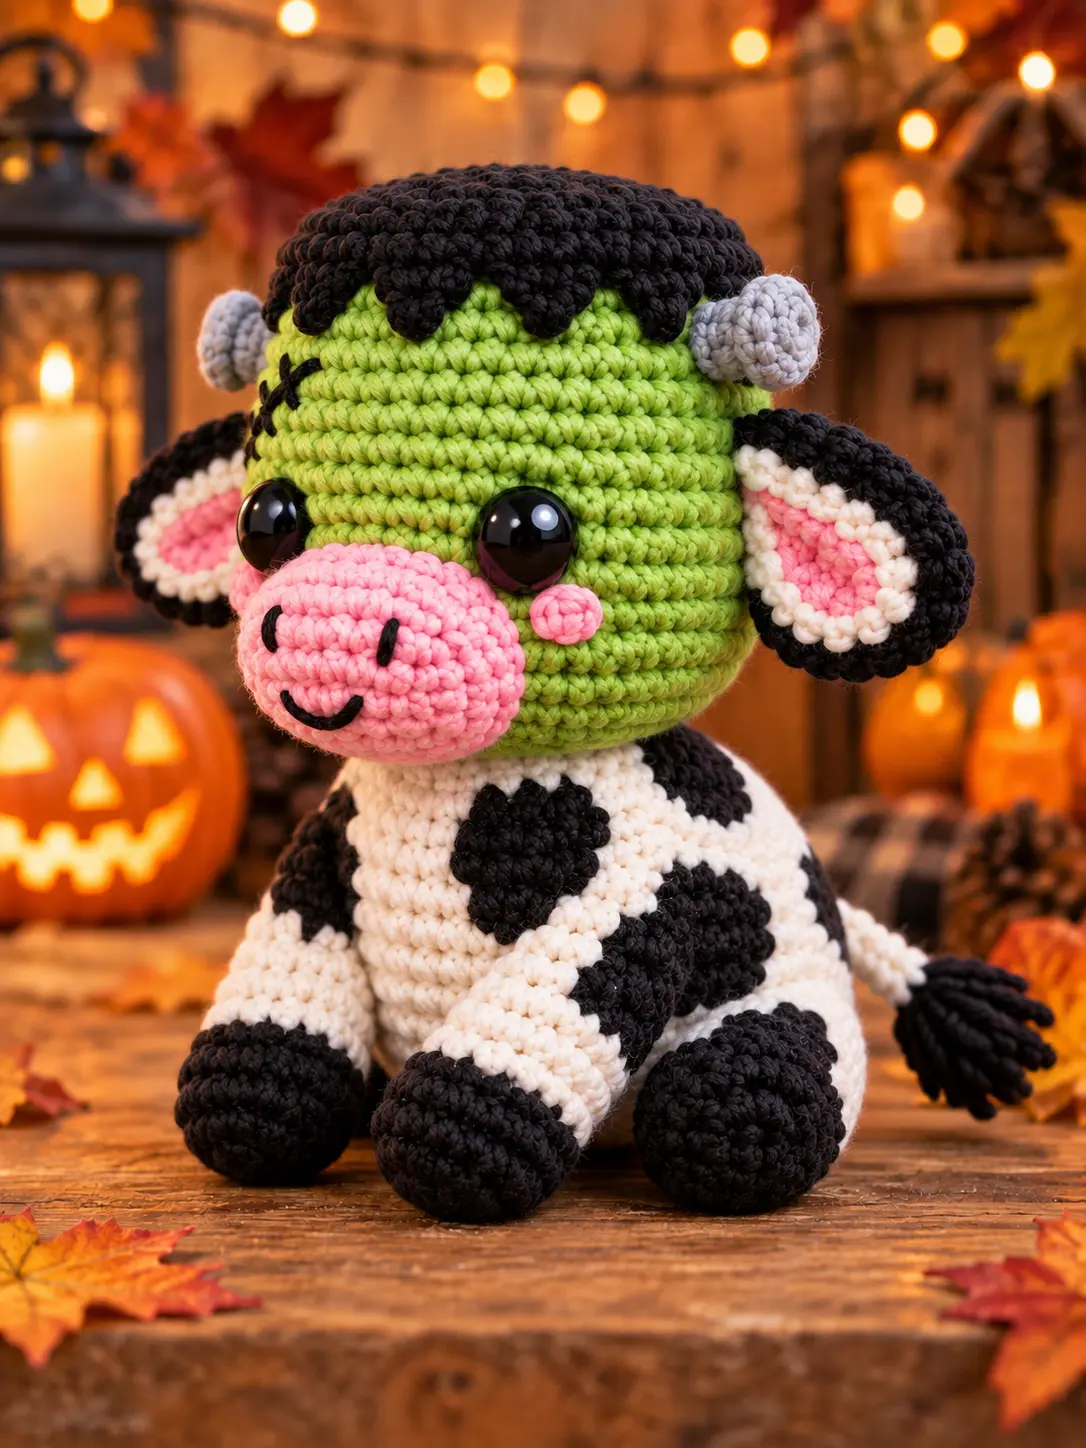
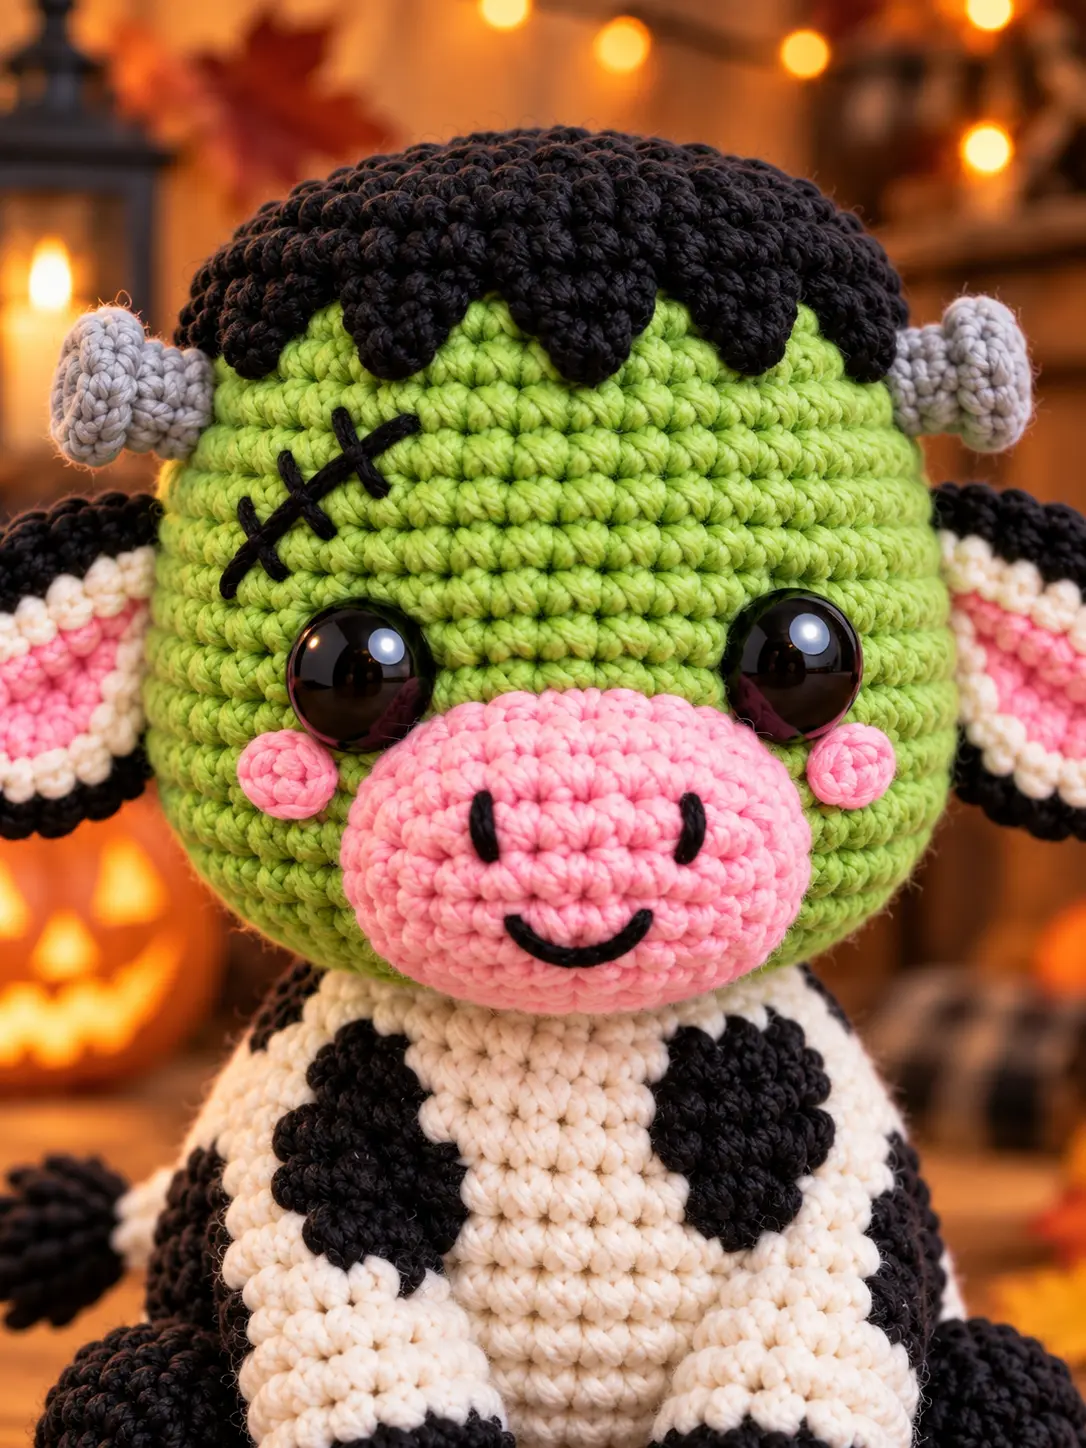
Meet Frankie Moo, a cuddly little cow with a playful Frankenstein makeover. This Halloween amigurumi combines a round green monster head with classic black-and-cream cow markings, a soft pink muzzle, tiny gray neck bolts, and a thick fringe of black yarn hair. The result is spooky enough for October and sweet enough to display all autumn.
This complete pattern was rebuilt to match the finished crochet character shown in the photos. The head and body are separate shapes, the four legs have rounded black hooves, and the layered ears include black outer ears, cream centers, and pink inner ears. Every increase and decrease total has been checked so that the pieces close correctly and fit together as described.
About This Frankenstein Cow Crochet Pattern
Frankie Moo is worked mostly in continuous spiral rounds using single crochet. The separate pieces make the character easy to shape and give you control over the final pose. Simple flat appliqués create the cow spots, while embroidered details form the nostrils, smile, and forehead scar.
The pattern is best for an adventurous beginner or intermediate crocheter. You should already know how to make a magic ring, increase, invisible decrease, change color, work in the back loop only, and sew amigurumi pieces together.
Finished Size
Using DK or light worsted yarn and a 2.5 mm crochet hook, Frankie Moo measures approximately 14–16 cm (5.5–6.25 inches) tall while seated. Your finished size may change with your yarn, hook, tension, and stuffing.
Materials
- Green DK or light worsted yarn for the head
- Cream or off-white yarn for the body, upper legs, ear centers, and tail
- Black yarn for the hair, outer ears, hooves, spots, tail tuft, and embroidery
- Pink yarn for the muzzle, inner ears, and cheeks
- Gray yarn for the two bolts
- Two 10 mm safety eyes
- 2.5 mm crochet hook
- Polyester fiberfill
- Yarn needle
- Stitch marker
- Scissors
- Sewing pins, optional but helpful
Abbreviations
This pattern uses US crochet terms.
- BLO: back loop only
- ch: chain
- dc: double crochet
- dec: invisible single crochet decrease
- FLO: front loop only
- FO: fasten off
- hdc: half double crochet
- inc: make 2 single crochet stitches in one stitch
- MR: magic ring
- rnd: round
- sc: single crochet
- sl st: slip stitch
- st/sts: stitch/stitches
Important Pattern Notes
- Work in continuous spiral rounds unless the instructions say otherwise.
- Place a marker in the first stitch of every round and move it up as you work.
- The number in parentheses at the end of a round is the stitch total for that round.
- Repeat instructions inside parentheses the stated number of times.
- Use an invisible decrease for a smooth amigurumi finish.
- Stuff with many small pieces of fiberfill. This makes the curves smoother than pushing in one large piece.
- Leave a long sewing tail whenever a piece will be attached later.
1. Green Frankenstein Head
Use green yarn. Begin at the top of the head.
- Rnd 1: 6 sc in MR. (6)
- Rnd 2: Inc in every st around. (12)
- Rnd 3: (1 sc, inc) × 6. (18)
- Rnd 4: (2 sc, inc) × 6. (24)
- Rnd 5: (3 sc, inc) × 6. (30)
- Rnd 6: (4 sc, inc) × 6. (36)
- Rnds 7–13: Sc around. (36)
- Rnd 14: (4 sc, dec) × 6. (30)
- Rnd 15: (3 sc, dec) × 6. (24)
Place the safety eyes between Rounds 10 and 11 with 8 visible stitches between them. The pink muzzle will sit directly below the eyes, so check its position before fastening the eye backs.
- Rnd 16: (2 sc, dec) × 6. (18)
- Rnd 17: (1 sc, dec) × 6. (12)
Stuff the head firmly, adding extra filling around the sides so the head stays round.
- Rnd 18: Dec around. (6)
FO. Thread the tail through the front loops of the final 6 stitches, pull the opening closed, secure it, and hide the tail inside.
2. Cream Cow Body
Use cream yarn. The body is made from the bottom upward and becomes narrower at the neck.
- Rnd 1: 6 sc in MR. (6)
- Rnd 2: Inc around. (12)
- Rnd 3: (1 sc, inc) × 6. (18)
- Rnd 4: (2 sc, inc) × 6. (24)
- Rnd 5: (3 sc, inc) × 6. (30)
- Rnds 6–8: Sc around. (30)
- Rnd 9: (3 sc, dec) × 6. (24)
- Rnds 10–12: Sc around. (24)
- Rnd 13: (2 sc, dec) × 6. (18)
- Rnds 14–16: Sc around. (18)
- Rnd 17: (1 sc, dec) × 6. (12)
Stuff the body firmly, keeping the lower half rounded and the top slightly flatter. FO and leave a long tail. Keep the 12-stitch opening unclosed for sewing the body beneath the head.
3. Front Legs and Black Hooves — Make 2
Begin with black yarn at the hoof.
- Rnd 1: 6 sc in MR. (6)
- Rnd 2: Inc around. (12)
- Rnds 3–4: Sc around. (12)
Change to cream yarn.
- Rnd 5: Working in BLO, sc around. (12)
- Rnds 6–8: Sc around. (12)
- Rnd 9: (1 sc, dec) × 4. (8)
Stuff the hoof firmly and add only a little stuffing to the cream section. Flatten the opening and make 4 sc through both layers. FO and leave a long tail.
4. Hind Legs and Black Hooves — Make 2
Begin with black yarn. These legs are wider than the front legs so the cow can sit steadily.
- Rnd 1: 6 sc in MR. (6)
- Rnd 2: Inc around. (12)
- Rnd 3: (1 sc, inc) × 6. (18)
- Rnd 4: Sc around. (18)
Change to cream yarn.
- Rnd 5: Working in BLO, sc around. (18)
- Rnds 6–7: Sc around. (18)
- Rnd 8: (1 sc, dec) × 6. (12)
- Rnd 9: Sc around. (12)
Stuff the hoof and lower leg. Flatten the opening and make 6 sc through both layers. FO and leave a long tail.
5. Layered Cow Ears — Make 2
Each ear has a black outer oval, a cream middle oval, and a smaller pink inner oval.
Black Outer Ear
Use black yarn and ch 6.
- Rnd 1: Starting in the second ch from the hook, sc in next 4 ch, 3 sc in last ch. Continue along the unused side of the chain: sc in next 3 ch, inc in final ch. (12)
- Rnd 2: Inc, sc in next 3 sts, inc in next 3 sts, sc in next 3 sts, inc in final 2 sts. (18)
Join with a sl st and FO, leaving a sewing tail.
Cream Ear Center
Use cream yarn and ch 5.
- Rnd 1: Starting in the second ch from the hook, sc in next 3 ch, 3 sc in last ch. Continue along the unused side: sc in next 2 ch, inc in final ch. (10)
- Rnd 2: Inc, sc in next 2 sts, inc in next 3 sts, sc in next 2 sts, inc in final 2 sts. (16)
Join and FO.
Pink Inner Ear
Use pink yarn and ch 4.
- Rnd 1: Starting in the second ch from the hook, sc in next 2 ch, 3 sc in last ch. Continue along the unused side: sc in next ch, inc in final ch. (8)
Join and FO. Center the pink oval on the cream oval and sew it down. Center both on the black outer ear and sew the cream edge to the black piece. Pinch the narrow base of the finished ear together and secure it with two or three stitches. This pinch gives the ear its cupped shape.
6. Pink Oval Muzzle
Use pink yarn and ch 7.
- Rnd 1: Starting in the second ch from the hook, sc in next 5 ch, 3 sc in last ch. Continue along the unused side: sc in next 4 ch, inc in final ch. (14)
- Rnd 2: Inc, sc in next 4 sts, inc in next 3 sts, sc in next 4 sts, inc in final 2 sts. (20)
- Rnd 3: (1 sc, inc), sc in next 4 sts, (1 sc, inc) × 3, sc in next 4 sts, (1 sc, inc) × 2. (26)
- Rnd 4: Sc around. (26)
Join with a sl st and FO, leaving a long tail. Embroider two short vertical nostrils with black yarn. Add a small curved smile below the nostrils. Pin the muzzle across the lower front of the head, approximately between Rounds 11 and 16. Sew around the edge, adding a small amount of stuffing before closing the final few stitches.
7. Pink Cheeks — Make 2
Use pink yarn.
- Rnd 1: 6 sc in MR. (6)
Join and FO with a sewing tail. Place one cheek just below and outside each eye, close to the upper corners of the muzzle.
8. Black Hair Cap and Jagged Fringe
Use black yarn. This shallow cap sits over the top of the green head.
- Rnd 1: 6 sc in MR. (6)
- Rnd 2: Inc around. (12)
- Rnd 3: (1 sc, inc) × 6. (18)
- Rnd 4: (2 sc, inc) × 6. (24)
- Rnd 5: (3 sc, inc) × 6. (30)
- Rnd 6: (4 sc, inc) × 6. (36)
- Rnd 7: Working in BLO, sc around. (36)
Do not fasten off. To make six chunky fringe points in the unused front loops of Round 6, repeat this sequence six times: sl st in next loop, sc in next loop, work (hdc, dc, hdc) in next loop, sc in next loop, sl st in next loop, sl st in next loop. The repeat uses all 36 front loops.
FO and leave a long tail. Place the cap on the head with two or three fringe points hanging over the forehead. Sew the back and sides of the cap to the green head. Leave the points free so they stay textured.
9. Gray Frankenstein Bolts — Make 2
Use gray yarn. Each bolt is shaped like a small spool with a narrow center and a wide disk at each end.
- Rnd 1: 6 sc in MR. (6)
- Rnd 2: Inc around. (12)
- Rnd 3: Working in BLO, sc around. (12)
- Rnd 4: Working in BLO, dec around. (6)
- Rnds 5–7: Sc around. (6)
- Rnd 8: Working in FLO, inc around. (12)
- Rnd 9: Sc around. (12)
Add a tiny pinch of stuffing to the narrow center. Flatten the open end and FO with a long tail. Sew one bolt to each side of the head between Rounds 6 and 8, directly below the hair cap. The narrow post should point outward and the wide end should remain visible.
10. Black Cow Spots
Make five to seven spots in mixed sizes. Use black yarn and choose from the three templates below. Changing the starting and ending points slightly will make the markings look natural.
Small Spot
- Rnd 1: 6 sc in MR. (6)
- Rnd 2: (1 sc, inc) × 3. (9)
Medium Spot
- Rnd 1: 6 sc in MR. (6)
- Rnd 2: Inc around. (12)
- Rnd 3: (1 sc, inc) × 6. (18)
Irregular Spot
- Rnd 1: 6 sc in MR. (6)
- Rnd 2: (1 sc, inc) × 3. (9)
- Rnd 3: Sc in next 2 sts, 3 sc in next st, sc in next 2 sts, inc, sc in next 2 sts, inc. (13)
Join and FO each spot with a sewing tail. Gently stretch the circles into uneven shapes. Arrange two or three spots on the front and sides of the body and the remaining spots on the upper legs. Keep the center front of the chest partly cream, as shown in the photos. Sew around each edge with small stitches.
11. Cream Tail With Black Tuft
Use cream yarn for the tail.
- Rnd 1: 6 sc in MR. (6)
- Rnds 2–7: Sc around. (6)
Do not stuff. FO and leave a tail for sewing. Cut four 10 cm (4 inch) lengths of black yarn. Fold them together, pull the folded centers through the closed end of the tail, and pass the loose ends through the loops. Pull gently to form a lark’s-head knot. Trim the tuft to about 2.5 cm (1 inch).
12. Forehead Scar
Thread a yarn needle with black yarn. Make one slightly diagonal line above the cow’s left eye. Add three short cross stitches over that line. Keep the stitches relaxed so they sit on the surface instead of pulling the green head inward.
Assembly
- Place the open top of the body against the bottom center of the head. Sew through each of the 12 body stitches and the head fabric. Go around twice for a strong join.
- Pin the hind legs low on the body at approximately Rounds 4–8. Angle the black hooves forward so Frankie Moo sits flat, then sew the flattened edges firmly in place.
- Pin the front legs between Body Rounds 11 and 15. Let the cream sections angle slightly inward and place the black hooves near the lower belly. Sew the flat tops to the body.
- Sew the layered ears to the sides of the head between Head Rounds 8 and 11. Keep the pink sides facing forward and align both ears at the same height.
- Attach the stuffed pink muzzle beneath the eyes. Sew on both cheeks.
- Position and sew the black hair cap. Add the embroidered forehead scar.
- Sew one gray bolt to each side of the head just under the hair.
- Arrange and sew the black spots on the body and legs.
- Sew the cream end of the tail to the back-right side of the body around Rounds 8–10. Leave the black tuft loose.
- Hide all yarn tails inside the nearest piece. Shape the head, muzzle, ears, and hooves gently with your fingers.
How the Stitch Counts Were Checked
The head increases by six stitches per increase round from 6 to 36, then reverses through 30, 24, 18, 12, and 6. The body also grows in six-stitch steps to 30 and narrows evenly to a 12-stitch neck. Each front leg reduces from 12 to 8 before its 4-stitch flat closure, and each hind leg reduces from 18 to 12 before its 6-stitch closure. Both ear ovals and the muzzle use the correct number of foundation-chain stitches on each side. The 36-loop hair fringe is divided into six equal 6-loop repeats.
Helpful Tips
Pin Every Piece First
The large head makes placement important. Pin the legs, ears, muzzle, hair, and bolts before sewing. View the cow from the front and both sides to check symmetry.
Keep the Muzzle Softly Stuffed
A little stuffing gives the muzzle the rounded look in the photos. Too much stuffing can hide the lower parts of the eyes or stretch the pink stitches.
Make the Cow Spots Uneven
Do not force every spot into a perfect circle. Stretch one edge, tuck another edge under, or overlap a leg seam slightly. Irregular shapes create a more convincing cow pattern.
Stabilize the Heavy Head
Sew the body-to-head seam twice. If the head still tips forward, add a little more stuffing to the upper body and position the front legs so the hooves lightly touch the table.
Use Matching Yarn Weights
Use the same yarn weight for all colors. A thicker black or pink yarn can make the hair, spots, or muzzle larger than the pieces they need to fit.
Ways to Customize Frankie Moo
- Use lavender or mint green for a softer monster color.
- Replace the gray bolts with silver yarn.
- Add one tiny orange bow tie beneath the head.
- Make a matching regular cow by using cream yarn for the head and leaving off the hair, bolts, and scar.
- Use embroidered eyes instead of plastic safety eyes.
- Add a hanging loop to the back of the hair cap for a Halloween ornament.
Frequently Asked Questions
Can a beginner make this pattern?
A confident beginner can make Frankie Moo. The basic shapes use simple amigurumi stitches. The layered ears, oval muzzle, and careful assembly add a little challenge.
Why does my cow’s head lean forward?
The head is intentionally large. Stuff the upper body firmly, keep the body opening centered under the head, and sew around the neck twice. The front hooves can also rest against the surface to support the pose.
Can I crochet the spots directly into the body?
You can use tapestry crochet or frequent color changes, but flat appliqué spots are easier to place and create the raised handmade look shown in the photos.
Can I make Frankie Moo larger?
Yes. Use thicker yarn and the smallest hook that creates a tight fabric. Increase the safety-eye size to suit the larger head. All pieces must be made with the same yarn weight so their proportions stay consistent.
Can I use embroidered eyes?
Yes. Embroidered eyes are the safest choice for a decoration that may be handled by a baby or young child. Use several secure satin stitches with black yarn and add a tiny white highlight if desired.
Safety and Care
Frankie Moo is designed as a decorative Halloween collectible. Plastic safety eyes and small sewn pieces can be choking hazards, so keep the finished item away from children under three and pets. For a child-friendly version, embroider the eyes and secure every part very firmly.
Spot-clean gently with cool water and mild soap. Do not twist the ears, bolts, or tail. Let the crochet dry flat and reshape it while damp. Keep all yarn decorations away from candles, heaters, hot bulbs, and open flames.
Your Frankie Moo Is Finished
Once the final yarn tails are hidden, give the ears a gentle curve, arrange the black fringe over the green forehead, and set the four hooves evenly. Your Frankenstein cow is ready to bring a funny little “moo-ster” smile to a Halloween shelf, desk, party table, or handmade gift basket.
SEO Details
SEO title: Frankie Moo Frankenstein Cow Free Crochet Pattern
Meta description: Crochet Frankie Moo, a cute Frankenstein cow amigurumi with a green monster head, black cow spots, pink muzzle, gray bolts, and four little hooves.
Suggested URL slug: frankie-moo-frankenstein-cow-free-crochet-pattern
Main keyword: Frankenstein cow crochet pattern
Related keywords: Halloween cow amigurumi, monster cow crochet pattern, free Halloween crochet pattern, cute Frankenstein amigurumi